So I have been busy working working working on all these new things, and haven't actually had time to write! I'm nearing completion on three knitting patterns, as well as the blanket that I made for my kiddo so those should be coming up some time in the next week. I've also got some craft projects to post and have been working like mad on the Bernat Mystery Crochet Along!
Next project: Girls' Easter Sweaters :) Anyone know of any good patterns?

Bernat's Crochet Along! Are you in?
Bernat just started their 2012 Mystery Crochet Along last Wednesday, and I'm doing it! I won't post anything until it's done, because I don't want to spoil the surprise for anyone who is doing it.... but if you're one of my readers and you're participating, I would love to know!!!
*Edited to add: I realized I didn't put a link to the Crochet Along anywhere in this post, so here it is!
Bernat 2012 Mystery Crochet Along!
*Edited to add: I realized I didn't put a link to the Crochet Along anywhere in this post, so here it is!
Bernat 2012 Mystery Crochet Along!
Just a short post today with an update...
I have hit the end of all of the holiday crafting posts. I will have some valentines crafting posts coming up soon *crosses fingers* but the way life has been lately, it's been all doing and no refining patterns.
I'm working on several fun projects and here's what you can expect in the coming months:
The revival of "30 days of Hats"
I have been designing like mad, and am nearing completion on my 30 days of hats project! Get ready for an explosion of new hats that you can crochet!
Several Knitting patterns
Yes, I have ventured into the world of knitting and have written a couple of knitting patterns.
Crochet-a-thon for Charity
I am planning to do a marathon crocheting adventure- I haven't decided the length, but I think it will be at least 12 hours, of just crocheting for charity. I will be making a variety of items, such as preemie hats, bird's nests (for rescue centers), and hats for Cancer patients.
My first Afghan pattern
My eldest daughter requested that I make a blankie for her like her sisters. I made her sisters blanket from just a simple expanded granny square, and it was very easy. I thought about doing that again for hers, but then changed my mind, deciding that I wanted to make hers something a little more grown up. I ended up, as I usually do, designing my own pattern and am going to post it on here to share!
New simple crochet projects
I've got a couple of other simple crochet projects that I've worked on and will share here for you. :)
So be patient, there will probably be a little lapse in posts while I prepare all of these things, but I'm sure I'll also sneak some peeks in there for you all!
Sometimes you just have a day of Fail....
As a crocheter, I love yarn. But I like yarn best when it is doing what I want and I'm not mucking things all up.
My eldest daughter asked me to make her a blankie that she could snuggle with. Naturally, I love making things, especially when one of my children asks me to. I set out to find a pattern that I liked and was relatively unsuccessful. I did find a picture of a blanket that I thought was really awesome, but the pattern for it was $28. RIDICULOUS.
Why, would I, someone who has been crocheting for years and years, ever want to pay that much for a pattern? I can understand if it was some dynamically awesome blanket that also did your chores for you, or perhaps crocheted itself, but really, that was ridiculous.
So, I did what I always do, and zoomed in and enhanced the photo of the afghan and began to test. I tried about ten different stitches, still am not sure what kind of stitch it is. I ended up doing a granny style version of it, and it's looking pretty good.
Except... there are a number of "fails"
Sometimes, I pull all the yarn out and remove the "fails" and other times, they serve to my advantage. None of the fails are going to make the blanket fall apart, they're just simple errors in my calculation that make the piece either not match the pattern, or they take on a life of their own.
Fail #1- I didn't swatch the colors to see how they would go together, and now, after having done the whole center of the blanket, I've decided that I wouldn't have done the color pattern this way if I had been paying attention properly when I began. So do I pull the whole thing apart or scrap what I've got and start over? No, I've decided that I'm going to embrace the color pattern in the center and continue on with what I had planned and let it have a unique middle to it.
Fail #2- I didn't check the brand or dye lot of the purple that I had been using when I started the afghan when I went and bought a whole new pound of yarn. They don't match, albeit they're close. I can't take the new yarn back because I've already ripped into it and started unraveling the skein. I could rip all of the piece apart and replace the other purple with this purple and fix "Fail #1" with this as well, but I've decided once again, to let my flaws shine a little and let it be.
Fail #3- After switching colors as I had wanted to (remember Fail #1) I started the next row with the wrong color! How did I do that? I certainly thought I knew what I was doing... And what's even worse is that I managed to get all the way through that color- 5 rounds, and three rounds into the next before I noticed and decided that this wasn't right. This time, I pulled out my error. I had only been working on one side of the piece and decided that this was worth pulling out the yarn. My bad. whoops. Hopefully when I reattach the yarn I do a better job of paying attention.
So why am I sharing this with you? For two reasons-
1: My whole pattern creation process more or less defines why I offer my patterns up for free. Chances are, if you're a crocheter, then you have a basic knowledge of the stitches and can do exactly what I did. You too can look at a picture and design your own pattern based off of it, and perhaps even come up with something cooler than your example. I figure, I did it, you can do it too, so I may as well save you the hassle and share it with you as well. After all, crochet love is universal, right? (And a mighty shout out to my peeps from the UK, Canada, Australia and Germany who all popped up on my visitors list!)
2: I am also sharing this with you because sometimes it's okay to have "Fails" in your craft, and it's also okay to embrace those failures and learn from them. Sometimes you have to do the right thing and backtrack, and other times you can let that little fail be your signature on the piece. The important thing is to enjoy yourself and to not let the little fails be something that stops you from doing something you love.
Very special gloves for a very special lady

If you can't tell, I'm all about gifts of the homemade variety. I always try to make something special or unique that you wouldn't be able to get anywhere else and usually make it something that is unique to my gift receiver. This year, I knit my very first pair of gloves. I made them for my grandmother in-law who is one of the most wonderful women that I have ever had the pleasure of meeting, let alone being able to call family. Many years ago, she worked for a factory. One day, she had the misfortune of the machine clamping down on her hand and cutting off the fingers of her right hand. They went straight to the hospital, with her fingers, but were unable to reattach them. Ever since, she has lived, and done quite well with just one good hand. (She cross-stitches, and she's amazing at it- a true inspiration)
On one of my visits to my husbands' hometown, I was testing out a knitting pattern, trying to see if I could get the hang of it. I finished off one fingerless mitt (wasn't really happy with it, and to this day, this particular mitt is still sitting in the bottom of my "to-finish" stack). Well she tried it on, and made an offhand comment that she hadn't ever had a properly made pair of gloves. She couldn't wear gloves because they didn't fit her bad hand, and fingerless mitts left her cold.
I took it upon myself to try and find a pretty pattern, and to work making a pair of gloves that would serve her needs. I made the left hand just as the pattern described, which was hard enough itself, as this was the first time that I had ever made fingers. It took weeks of putting it down, picking it up, getting frustrated, getting over it and putting it back down again before I was finally done.
Then, I left it alone for about week, wondering if I would ever be finished with them. Then in a sudden burst of inspiration, I started and finished the second glove, which turned out to be much easier because instead of fingers, all I had to do was keep knitting and then close off as if for a mitten. It worked great.
Overall, not my finest work, the fingers were a wee bit funky, and the cuffs did this weird thing, probably because I didn't do a garter stitch for long enough, but the reaction was all worth it. She laughed and hugged me and tried them on many times for everyone to see. It is this sort of gifting that makes all of my crazy labor over the year worth while.
Why don't you try finding one truly unique thing you can make for someone this year? You might be surprised at how it makes you feel!
Flying Birds Stitch Washcloth {Crochet Pattern}

Copyright 2010-2012 LiLu Studios: This Crafting Life, by Lori Steffens. {http://www.thiscraftinglife.com/} Make it, Wear it, Love it, but above all, Share it, don't Sell it!
Here's another pattern that I've written, this one also meant for my holiday gifting from Christmas 2011. It's a really simple washcloth that can be embellished by adding a border or you can make it wider or taller in any way you see fit. If I had been smart and gauged it out a little better beforehand, I could have gotten the colors to line up in rows and make it look a little more finished. Either way, I still think it looks nice and the v stitch gives it a really nice texture.
Materials:
I like using cotton yarn for my bathroom items, and for this I used Sugar and Cream yarn in this pretty ombre.
A size H crochet hook
Instructions
Pattern:
Ch 30
Row 1: Sc in second chain from hook, *ch 1, sk next ch, sc* repeat to end, turn.
Row 2: ch2, hdc in next st, *ch1, hdc dec* to end, turn.
Row 3: ch1, *sc, ch1, sk next st* repeat to end, turn
Repeat rows 2 and 3 until your washcloth is square.
Row 2: ch2, hdc in next st, *ch1, hdc dec* to end, turn.
Row 3: ch1, *sc, ch1, sk next st* repeat to end, turn
Repeat rows 2 and 3 until your washcloth is square.
My Sister In Laws House Rules plus Canvas Transfer


Sometimes, when I get an Idea in my head, I can be a real idiot about it. I had planned on making my sister in-law something crocheted, but bombed at my first attempt and then just couldn't think of anything better to make. Well, one day, like an idiot, I'm going through pinterest (perhaps someday I'll talk about why pinterest is oh so very dangerous to my productivity levels) and see these great house rules. Then, I see a canvas transfer and I'm like "Wheeee! I'll put them together and it will look AWESOME! Plus, it will be way easier than crocheting something!"
*disclaimer: when you can crochet a hat in an hour, attempting any new project such as this definitely should not be classified as "easier."*
Durrr. I spent probably a total of 10-15 hours working on this blasted thing, partially because I couldn't find the rub-off letters that I wanted (which in hindsight, should have looked harder for) and ended up doing stencils on the whole thing. By the time I had all the white stenciled, I had smears and splotches and had to go back with the black.
Let me state, photo transfers are awesome. They're fun, they're cool and I guarantee that I'll be doing a lot more of them in the future. I did two when I first made them, "Just In Case" and boy was I glad I did. The first one I glued down onto the black and it looked terrible. Their faces pretty much disappeared and I ended up painting white over it, and putting down the second transfer.
They got their final coat spray the night before we left to go back to visit them, and wrapped sometime around 4 am....
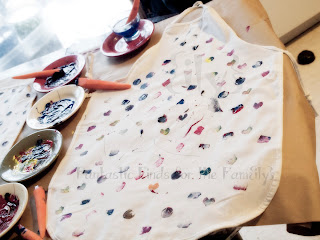
Mosaic Aprons {Craft Tutorial}
Going off of an idea from the Disney Family Fun website for making your own mosaic shirt, I decided that this Saturday at our Play Day, we'll be making aprons for all of our artistic ventures.
What you'll need:

Something to be your apron: By this, I mean that you can do one of two things: you can A) go to the craft store, or the kitchen store, or goodwill or whatever and buy yourself a couple of aprons or you can B) upcycle one of your old white T-shirts or you can C) go and purchase a plain white T-shirt to upcycle. If you want to upcycle a tshirt to an apron, all you have to do is cut the sleeves and back shoulders off (leaving the hole for the neck, and use the lower part of the shirt to cut a piece that can tie in the back). I shopped around and found several options for aprons that you could buy, and after looking on Amazon and seeing that the cheapest one was around $15, I decided to take my chances with the local craft store. A stop at Michael's proved to be worth it, as I scored two aprons for just $1 each!
Carrots: You will cut these into shapes and they will be used as your stampers.

Fabric Paint or Ink: I used Fabric Screen Printing ink, since I had some lying around. Just make sure that you follow any setting instructions that are included with the ink/paint. Mine said to let it air dry for a couple of hours, then to lay a paper bag or Kraft paper on top, and then iron for about two minutes to heat set the ink.
Notes:
Unfortunately, while you're making aprons, you probably don't have one to wear... so make sure that you wear an old t-shirt that you don't care about when you do this project. That way you won't mourn stains on your clothing!


When they're all done, let the aprons air dry for a couple of hours and then heat set per paint instructions.

What you'll need:

Something to be your apron: By this, I mean that you can do one of two things: you can A) go to the craft store, or the kitchen store, or goodwill or whatever and buy yourself a couple of aprons or you can B) upcycle one of your old white T-shirts or you can C) go and purchase a plain white T-shirt to upcycle. If you want to upcycle a tshirt to an apron, all you have to do is cut the sleeves and back shoulders off (leaving the hole for the neck, and use the lower part of the shirt to cut a piece that can tie in the back). I shopped around and found several options for aprons that you could buy, and after looking on Amazon and seeing that the cheapest one was around $15, I decided to take my chances with the local craft store. A stop at Michael's proved to be worth it, as I scored two aprons for just $1 each!
Carrots: You will cut these into shapes and they will be used as your stampers.

Fabric Paint or Ink: I used Fabric Screen Printing ink, since I had some lying around. Just make sure that you follow any setting instructions that are included with the ink/paint. Mine said to let it air dry for a couple of hours, then to lay a paper bag or Kraft paper on top, and then iron for about two minutes to heat set the ink.
Notes:
Unfortunately, while you're making aprons, you probably don't have one to wear... so make sure that you wear an old t-shirt that you don't care about when you do this project. That way you won't mourn stains on your clothing!
Tip: Have everything all set up before you start. Your kids will get bored quickly if they have to wait for you to cut the carrots and prepare the ink. I laid out a piece of Kraft paper on my table so I wouldn't have any messes to clean up.Once you're all set up, all you have to do is roll up the kids' sleeves and let them stamp away!


When they're all done, let the aprons air dry for a couple of hours and then heat set per paint instructions.


My Mother in Law's Lapghan

This was the first Christmas present I started last year and also the first one that was done. I started it at my mother in law's house over our christmas vacation because her house can get very cold in the winter. She asked me what I was making and I said, "A blanket for your cold house," we laughed and I don't think she thought of it again. I'm sure she remembered when she opened up the box!
This one seemed to take me much longer than things usually do, but I think I just couldn't work on it for very long. I tend to like variety, but this one is pretty much the same pattern all the way around, so it worked up pretty easily, but very tediously for me.
My Mothers Decorative Afghan

When I set out to make my mother's gift this year, I wanted to make it something different. She knows how to crochet and she's made herself afghans in the past, so I wanted it to be something that she would never make for herself. I found a great pattern on Lion Brand Yarn's website, and modified the colors and removed some features to make this decorative afghan for her. It is called the removed the tassels that hung from the sides and attached things a little differently than they had.
I still feel that the afghan is missing something, if I were keeping it, I would probably add a border all around the outer edge, and I offered to do this for my mother if she wanted me to. I told her to take it for a test drive and if she wanted me to modify it in any way I could.
It was a challenging pattern, but visually striking I think! (And my mother loved it, btw)

Holiday crafting, Loofah {Crochet Pattern}
I made a couple of these Loofah's for inclusion in my holiday crafting this year. They're so easy to make and are such a great gift!

Copyright 2010-2012 LiLu Studios: This Crafting Life, by Lori Steffens. {http://www.thiscraftinglife.com/} Make it, Wear it, Love it, but above all, Share it, don't Sell it!
Materials:
Size H, I or J Hook
A cotton/acrylic blend of yarn. (You can also just use cotton, I do not recommend using straight acrylic yarn however)
A cotton/acrylic blend of yarn. (You can also just use cotton, I do not recommend using straight acrylic yarn however)
Instructions:
ch 4, form a ring by joining with a sl st in first st
ch 40
sl st into center of ring (this forms the loop for hanging the loofah)
R1: ch2, dc 40 into center of ring, join with sl st
R2: ch2, dc 3 in each st around, join with sl st
R3: ch2, dc 3 in each st around, join with sl st
R4: ch2, dc 3 in each st around, join with sl st
Bind off. Weave in ends.
You can play around with the thickness of the loofah here too, by in the last row, working 2dc, then 3dc around instead. It will give it a more ruffly texture and be a little looser.
You can play around with the thickness of the loofah here too, by in the last row, working 2dc, then 3dc around instead. It will give it a more ruffly texture and be a little looser.
Subscribe to:
Posts (Atom)